Service Accounts
It is also possible to request a Service-account that can be used to sync data from DWH to your environment. See https://docs.snowflake.com/en/user-guide/admin-user-management for an explanation of the different types of users.
A Service-account can not log in to Snowsight. It is only to be used for programmatic exchange of data. For example: if you want to collect data at regular intervals you would typically set this up using a service-account, since you do not want a person to log in at regular intervals. You don't want this because every time a person logs in, that person is forced to use MFA.
Private / public key setup
A Service-account can not use MFA. You will, however, need to establish a public/private key setup as described on https://docs.snowflake.com/en/user-guide/key-pair-auth. Please follow the steps on that page. It explains in detail the steps required. Basically these are:
- Go to https://slproweb.com/products/Win32OpenSSL.html and download the installer for OpenSSL Light (you don't need the full version)
- Install it.
- Add it to your PATH, using CTRL-R (run),
sysdm.cpl, Advanced → Environment Variables, Under System variables, select Path → Edit, Click New, enter "C:\Program Files\OpenSSL-Win64\bin". OK out of all dialogs. Open terminal, type "openssl", hit ENTER. It should show output (not errors). - In Terminal, change dir to where you want to store your key-files. For example:
C:\Keys\. - Generate an unencrypted 2048 bits RSA key:
openssl genrsa 2048 | openssl pkcs8 -topk8 -inform PEM -out C:\Keys\AA-Snowflake-rsa_key.p8 -nocrypt
Or generate an encrypted version (you will need to provide a password):
openssl genrsa 2048 | openssl pkcs8 -topk8 -v2 des3 -inform PEM -out C:\Keys\AA-Snowflake-rsa_key-encrypted.p8
- Check the contents of the newly generated file
C:\Keys\AA-Snowflake-rsa_key.p8. It should contain something like:
-----BEGIN PRIVATE KEY-----
MIIEvQIBADANBgkqhkiG9w0BAQEFAASCBKcwggSjAgEAAoIBAQDPZV1y/3ev8U0N
<snipped some 23 lines>
Zzztal24GmgY0SJho4x5cXKh+HFsZzX34A2nUt4AAJFYhBn1pmT/1rnMTzqDhKn3
G0W5OfOaNIghfxfY06JnsZM=
-----END PRIVATE KEY-----
If you generated an encrypted file, the contents would be roughly similar but the first and last line would read:
-----BEGIN ENCRYPTED PRIVATE KEY-----
<snipped 28 lines>
-----END ENCRYPTED PRIVATE KEY-----
- Generate public key from this private key:
openssl rsa -in C:\Keys\AA-Snowflake-rsa_key.p8 -pubout -out C:\Keys\AA-Snowflake-rsa_key.pub
Likewise, when used an encrypted private key:
openssl rsa -in C:\Keys\AA-Snowflake-rsa_key-encrypted.p8 -pubout -out C:\Keys\AA-Snowflake-rsa_key-encrypted.pub
- Verify the contents of your new public key file:
-----BEGIN PUBLIC KEY-----
MIIBIjANBgkqhkiG9w0BAQEFAAOCAQ8AMIIBCgKCAQEAz2Vdcv93r/FNDVuGQx2g
<snipped 5 lines>
>AwIDAQAB
-----END PUBLIC KEY-----
- Generate a finger print from your public key:
openssl rsa -pubin -in C:\Keys\AA-Snowflake-rsa_key.pub -outform DER | openssl dgst -sha256 -binary | openssl enc -base64
Likewise for encrypted key:
openssl rsa -pubin -in C:\Keys\AA-Snowflake-rsa_key-encrypted.pub -outform DER | openssl dgst -sha256 -binary | openssl enc -base64
This outputs something like:
Pw8/KD9zOUNoPz8/IHI/A0o/Dz8/OUQnaz8/Pz8XPz8NCg==
This last line, starting with Pw8 in this example, is your finger print.
If you intend to use this keypair from PowerBI Desktop, see PowerBI - Keypair Authentication for the two supported options, and which type of key (encrypted or unencrypted) each option requires.
Once you completed those steps, you will need to share with Paxon ⸗ Active Ants:
- Your public key (the file C:\Keys\AA-Snowflake-rsa_key.pub, or the equivalent file if you used an encrypted key).
- The finger print of your public key (that last line of output).
Paxon ⸗ Active Ants also needs the finger print, so that we can verify if key-pair authentication was set up correctly.
ODBC Access using private / public key setup
When using a SERVICE-type account with public/private keys, you will need to configure your ODBC DSN properly. There are 5 things you need to be aware off:
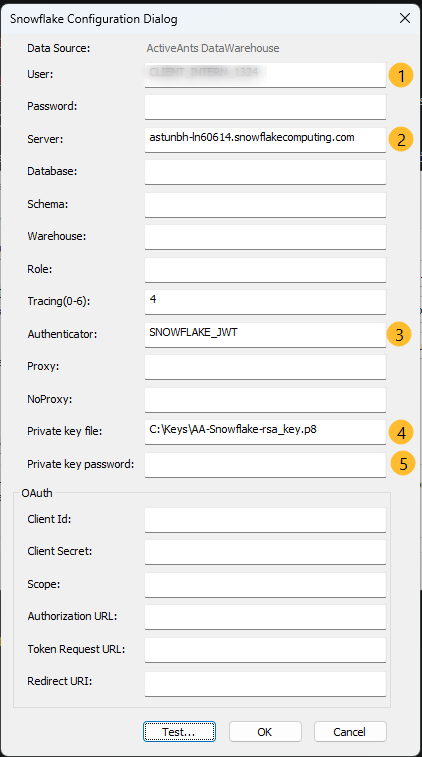
- Your username. Typically something like "CLIENT_1234" (but not really 1234).
- The Snowflake server address for the Active Ants data: astunbh-ln60614.snowflakecomputing.com
- The type of Authenticator. Always use the value
SNOWFLAKE_JWThere, when using public/private key setup. - The filepath to your private key file.
- The password to decrypt your private key file. Leave blank if you used an unencrypted private key.
See https://docs.snowflake.com/en/developer-guide/odbc/odbc-parameters#label-odbc-key-pair-authentication for more details.
Accounts Needed
A typical setup for clients would be like:
- one or more regular (person-type) user accounts to access DWH via SnowSight. These accounts typically have a username equal to your email address. It is mandatory to enable MFA on these accounts.
- one (service-type) user account to access DWH via ODBC / some other connector, for non-interactive purposes (basically: sync data). These accounts typically have a username like "CLIENT_1234" (where "1234" is an identifier linked to your account, this is just an example. Please don't really use "CLIENT_1234", it will not work).
Please ask your Account Manager at Paxon ⸗ Active Ants to have a service-account created for you.